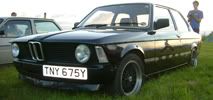
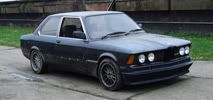
E12 tidy up.

Post Reply
pandemonium001
E21 Pro
Posts: 527
Joined: Sun Oct 07, 2012 1:19 pm
My E21(s): E12 535i T (ish)
Location: Scotland Ayrshire

Re: E12 tidy up.

Post by pandemonium001 »

Yesterdays efforts

Rear Brembo's on

Image
Image

the staining is alodine solution
Image


inserting riv nuts for handbrake
Image

clutch master rebuilt and painted
Image

test fit
Image

running the lines
Image
Image

trim re-installed
Image

decided to just start on the 3.5 so old engine out
Image

Image

will start removing all from engine bay then, clean, prep and paint.


pandemonium001
E21 Pro
Posts: 527
Joined: Sun Oct 07, 2012 1:19 pm
My E21(s): E12 535i T (ish)
Location: Scotland Ayrshire

Re: E12 tidy up.

Post by pandemonium001 »

Rear discs are now 300mm

engine balance bar ordered for installation, it was a pain to tilt the engine/gearbox combo with out one.
pandemonium001
E21 Pro
Posts: 527
Joined: Sun Oct 07, 2012 1:19 pm
My E21(s): E12 535i T (ish)
Location: Scotland Ayrshire

Re: E12 tidy up.

Post by pandemonium001 »

hopefully will be installing a faster ratio steering box from an e39 M5, if i can make it fit. and try and rig something up for the servotronic.
User avatar
nas80
E21 Mad
Posts: 2975
Joined: Sun Jun 14, 2009 12:12 am
Location: West Yorkshire

Re: E12 tidy up.

Post by nas80 »

I find it a million times easier to use the crane to to lift the car high and wheel the engine and subframe under and lower the body down on top.
[img]http://s13.photobucket.com/albums/a285/nasbucket/forumsig.jpg[/img]
pandemonium001
E21 Pro
Posts: 527
Joined: Sun Oct 07, 2012 1:19 pm
My E21(s): E12 535i T (ish)
Location: Scotland Ayrshire

Re: E12 tidy up.

Post by pandemonium001 »

started cleaning up the engine bay.
after lots of cleaning de greasing and removing brackets, got the spot blaster out
Image
Image
Image

had some zing phosphate primer spare
Image
Image
Image

after a bit of trimming
Image
Image
Image

FMIC is a nice fit and will clear the radiator easy. no mods to the front at all.
bottom bracket bolts between the bumper mounts and top will be rubber grommets to the slam panel. a few bits to trim file and double check and new brackets, then paint soon.

Nice big full alloy rad is on its way with twin lecky fans, expansion bottle will be e34 bulckhead style as that matches in with the engines hoses.
pandemonium001
E21 Pro
Posts: 527
Joined: Sun Oct 07, 2012 1:19 pm
My E21(s): E12 535i T (ish)
Location: Scotland Ayrshire

Re: E12 tidy up.

Post by pandemonium001 »

yes it is in the middle, the rad opening is off center as itr was an auto and had the oil cooler one side. :driving
User avatar
uwbuurman
E21 VIP
E21 VIP
Posts: 19101
Joined: Fri Jun 12, 2009 4:49 pm
My E21(s): 1978 type 1 323i 5speed dogleg Polaris
Location: Ljouwert

Re: E12 tidy up.

Post by uwbuurman »

Great progress!
It's the man next door!

1978 BMW 323i
1980 BMW 528i maior restitutio
1987 BMW 325iA cabriolet
2015 BMW 320dA touring xDrive High Executive ///Msport
2016 BMW 420dA Gran Coupé
User avatar
e21-Mark
E21 Master
Posts: 5715
Joined: Fri Mar 21, 2008 2:19 pm
My E21(s): 316 m52/2.8 Cat Cams & Jenvey ITB
Facebook page: https://www.facebook.com/JackyardBackoff
Location: Cornwall - UK

Re: E12 tidy up.

Post by e21-Mark »

Loving how this is going.
User avatar
nas80
E21 Mad
Posts: 2975
Joined: Sun Jun 14, 2009 12:12 am
Location: West Yorkshire

Re: E12 tidy up.

Post by nas80 »

Nice work Martin
[img]http://s13.photobucket.com/albums/a285/nasbucket/forumsig.jpg[/img]
rob0r
E21 Pro
Posts: 771
Joined: Sat May 20, 2006 6:03 pm
Location: Colchester/Sudbury

Re: E12 tidy up.

Post by rob0r »

Amazing work! Looks to be the same colour as my E23 too 8). Shameless plug, I have what I believe to be an E12 BBS front spoiler for sale if you wanted one :wink:
ImageImage
pandemonium001
E21 Pro
Posts: 527
Joined: Sun Oct 07, 2012 1:19 pm
My E21(s): E12 535i T (ish)
Location: Scotland Ayrshire

Re: E12 tidy up.

Post by pandemonium001 »

brackets made and rad installed:
Image
Image

blanking up
Image

Upol 2k High build on and drying.
Image
Image
Image

front subframe now removed.

wasted 2 hrs trying to get the crappy waxoyl extension tube working for the sill cavity wax, but no joy, will nee to invest in a decent one.
even with 20% spirit and heated next to the fire it would not spray 360 degrees.
User avatar
nas80
E21 Mad
Posts: 2975
Joined: Sun Jun 14, 2009 12:12 am
Location: West Yorkshire

Re: E12 tidy up.

Post by nas80 »

who made your rad?
[img]http://s13.photobucket.com/albums/a285/nasbucket/forumsig.jpg[/img]
pandemonium001
E21 Pro
Posts: 527
Joined: Sun Oct 07, 2012 1:19 pm
My E21(s): E12 535i T (ish)
Location: Scotland Ayrshire

Re: E12 tidy up.

Post by pandemonium001 »

ebay special. £144 delivered with shroud and fans. inlet and outlet need a bit of smoothing on joints on inside but otherwise cant complain.

Its the model for 180 sx sr20det
but I recon I could have fitted the slightly taller one from 200sx. the dims include the mounting pins.

http://www.ebay.co.uk/itm/52MM-3ROW-FOR ... 43d7581a80
User avatar
nas80
E21 Mad
Posts: 2975
Joined: Sun Jun 14, 2009 12:12 am
Location: West Yorkshire

Re: E12 tidy up.

Post by nas80 »

nice! did it come with the shroud?
[img]http://s13.photobucket.com/albums/a285/nasbucket/forumsig.jpg[/img]
pandemonium001
E21 Pro
Posts: 527
Joined: Sun Oct 07, 2012 1:19 pm
My E21(s): E12 535i T (ish)
Location: Scotland Ayrshire

Re: E12 tidy up.

Post by pandemonium001 »

They have one with the shroud and fans included in their shop. All 3 together £144. I will get some pics soon of the tank in/outlets that need blending. only 30mins with a deemed.
Post Reply